
In the following tutorial you will learn how to create a detailed clothespin illustration. It all starts with a simple pixel perfect vector shape building techniques. Then we’ll use the appearance panel and Illustrator effects to add dimension to the illustration. You can use these professional techniques to create quality icons, detailed web graphics, and more.
Step 1
Hit Command + N to create a new document. Enter 600 in the width and height boxes, then click on the Advanced button. Select RGB, Screen (72ppi) and make sure that the Align New Objects to Pixel Grid box is unchecked before your click OK. Enable the Grid (View > Show Grid) and the Snap to Grid (View > Snap to Grid).Next, you’ll need a grid every 5px. Go to Edit > Preferences > Guides > Grid, enter 5 in the Gridline every box and 1 in the Subdivisions box. You can also open the Info panel (Window > Info) for a live preview with the size and position of your shapes. Do not forget to replace the unit of measurement to pixels from Edit > Preferences > Unit > General. All these options will significantly increase your work speed.

Step 2
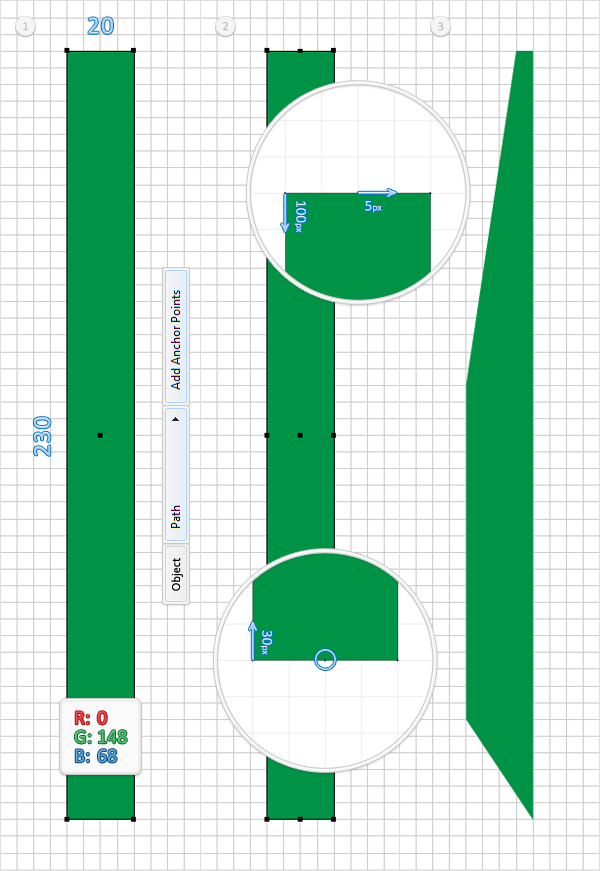
Pick the Rectangle Tool (M) and create a 20 by 230px shape. Fill it with R=0, G=148, B=68, and remove the color from the stroke. Select this green shape and go to Object > Path > Add Anchor Points.Make sure that this shape is still selected, switch to the Direct Selection Tool (A) and focus on the top anchor points. Select the top, left anchor point and move it 100px down, then select the top, middle anchor points and move it 5px to the right. The Snap to Grid should ease your work.
Continue with the Direct Selection Tool (A) and focus on the bottom anchor points. Select the bottom, left anchor point and move it 30px up. Keep focusing on the bottom anchor points, pick the Delete Anchor Points Tool (-) and click on the middle anchor point (the circled one). In the end your green shape should look like the third image shown.
Step 3
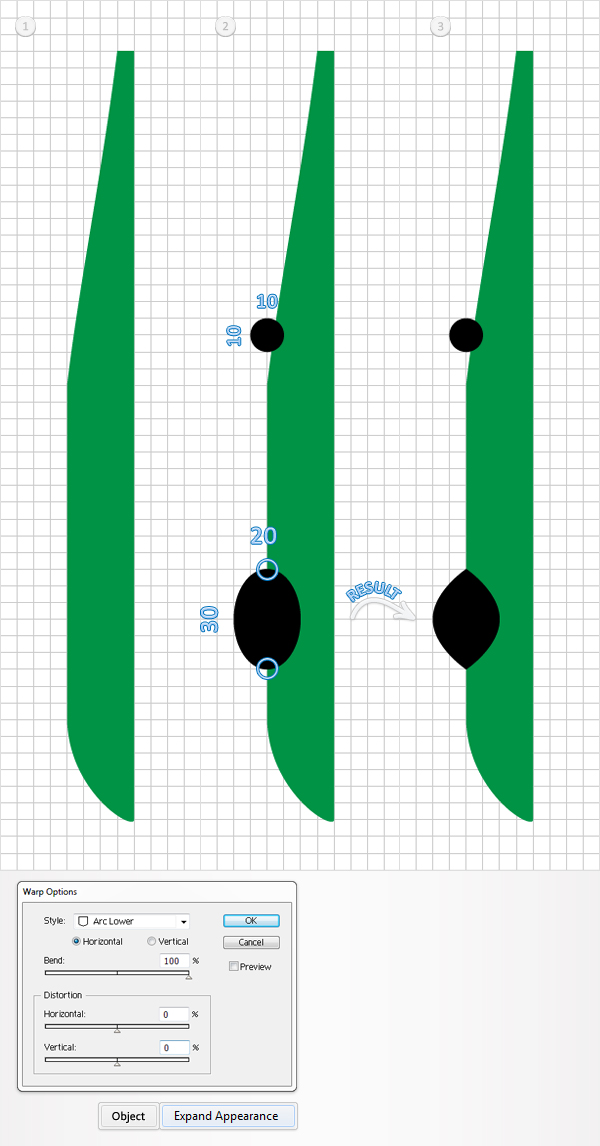
Reselect the shape created in the previous step and go to Effect > Warp > Arc Lower. Enter the data shown below, click OK and go to Object > Expand Appearance.Pick the Ellipse Tool, create a 10px circle, and place it as shown in the second image. Continue with the Ellipse Tool, create a 20 by 30px shape and place it as shown in the second image. Focus on this new shape, select it, pick the Convert Anchor Point Tool (Shift + C), and click on the top and bottom anchor points. In the end, it should look like the third image shown.
Step 4
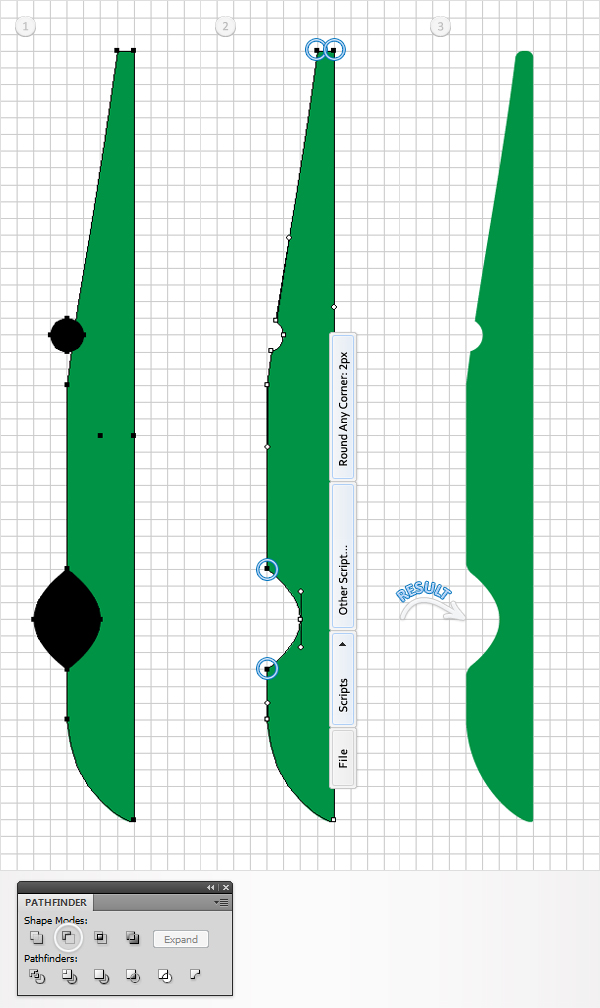
Select the green shape, along with the two shapes created in the previous step, open the Pathfinder panel (Window > Pathfinder) and click on the Minus Front button. The resulting shape should look like the second image shown.Next, you’ll need the Round Any Corner script. You can find it in the Vectortuts+ article 20 Free and Useful Adobe Illustrator Scripts. Save it to your hard drive, return to Illustrator, and grab the Direct Selection Tool (A).
Select the four anchor points highlighted in the second image and go to File > Scripts > Other Script. Open the Round Any Corner Script, enter a 2px Radius, and click OK. In the end, your shapes should look like the third image shown.
Step 5
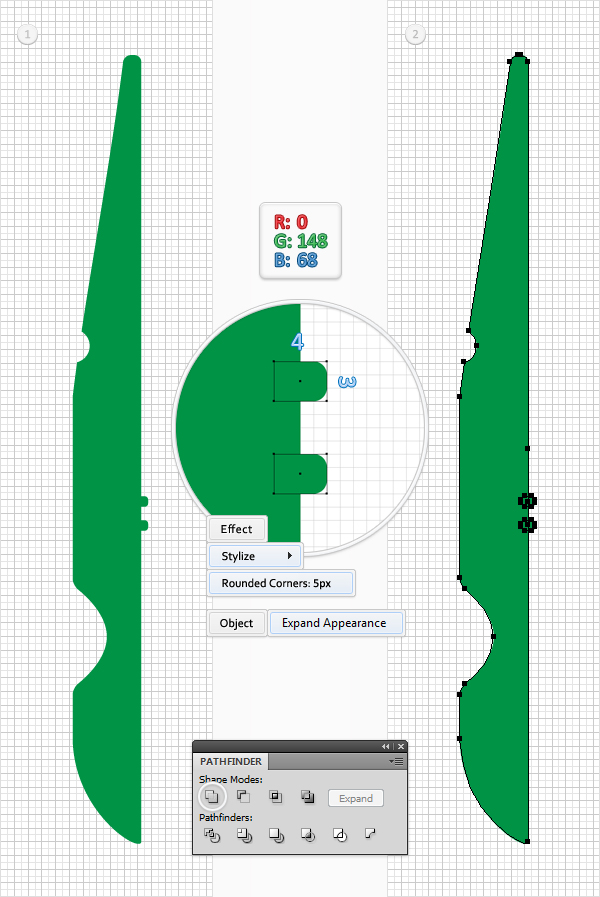
For the following image you will need a grid every 1px. So, go to Edit > Preferences > Guides & Grid and enter 1 in the Gridline every box. Pick the Rectangle Tool (M), create two, 4 by 3px shapes, and place them as shown in the first image.Now fill them with R=0, G=148, B=68, and go to Effect> Stylize > Rounded Corners. Enter a 5px radius, click OK, and go to Object > Expand Appearance. Select the resulting shapes, along with the large, green shape, and click on the Unite button from the Pathfinder panel.
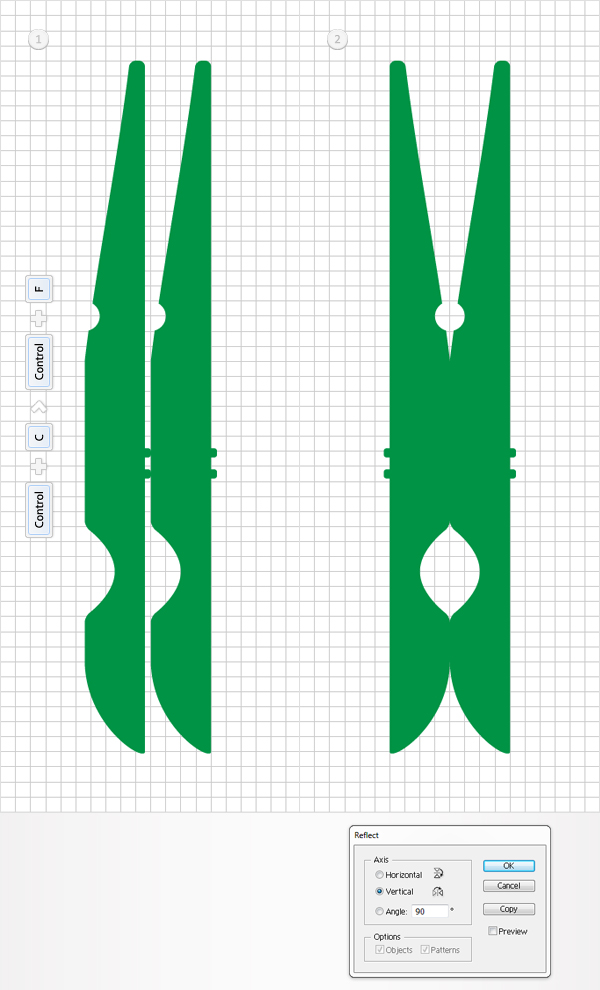
Step 6
We need to return to "gridline every 5px". So, go to Edit > Preferences > Guides & Grid and enter 5 in the Gridline every box.Reselect the green shape created in the previous step, make a copy in front (Command + C > Command + F), and drag it to the left as shown in the first image. The Snap to Grid should ease your work. Make sure that this copy is still selected and go to Object > Transform > Reflect. Check the Vertical button and click OK.
Step 7
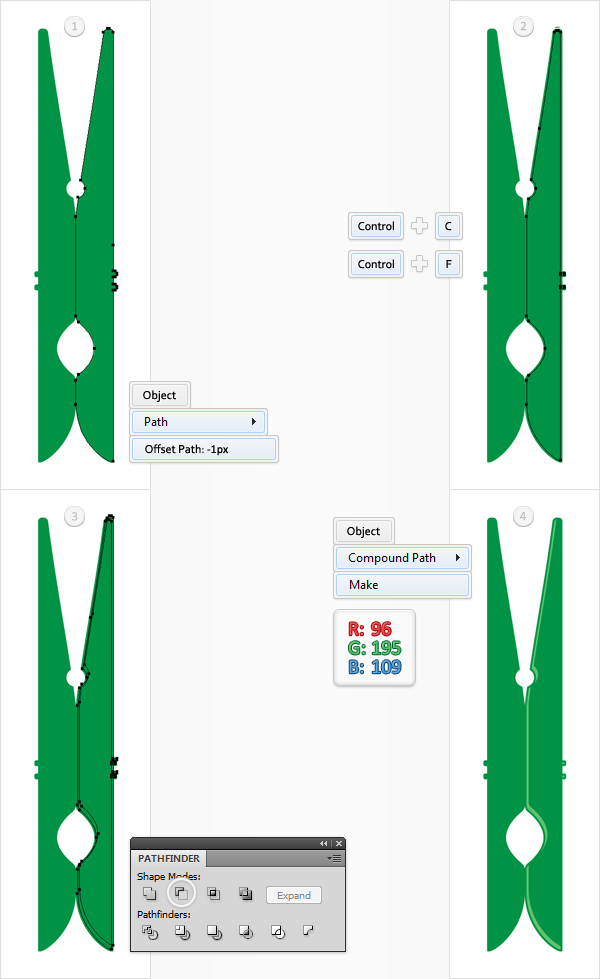
Disable the Grid (View > Show Grid) and the Snap to Grid (View > Snap to Grid) then go to Edit > Preferences > General and make sure that the Keyboard Increment is set at 1px. Select the right, green shape and go to Object > Path > Offset Path. Enter a -1px Offset and click OK.Duplicate the resulting shape (Command + C > Command + F). Select this copy and hit the right arrow once (to move it 1px to the right). Reselect both shapes created in this step, move to the Pathfinder panel, and click on the Minus Front button. Select the resulting group of shapes, turn it into a compound path (Object > Compound Path > Make), and fill it with R=96, G=195, B=109.
Step 8
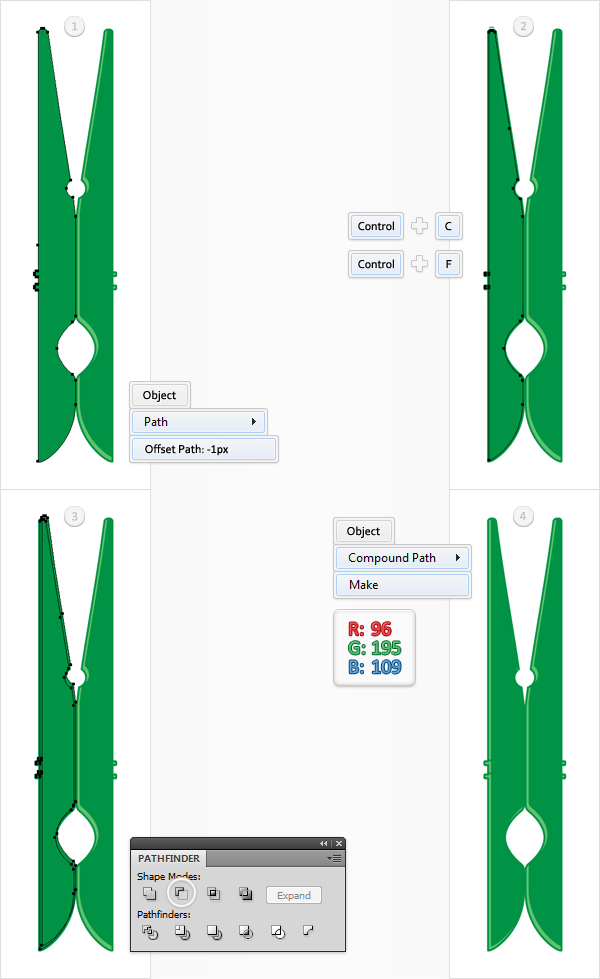
Select the left, green shape and go to Object > Path > Offset Path. Enter a -1px Offset and click OK. Duplicate the resulting shape (Command + C > Command + F). Select this copy and move it 1px to the right.Reselect both shapes created in this step, move to the Pathfinder panel, and click on the Minus Front button. Select the resulting group of shapes, turn it into a compound path (Object > Compound Path > Make), and fill it with R=96, G=195, B=109.
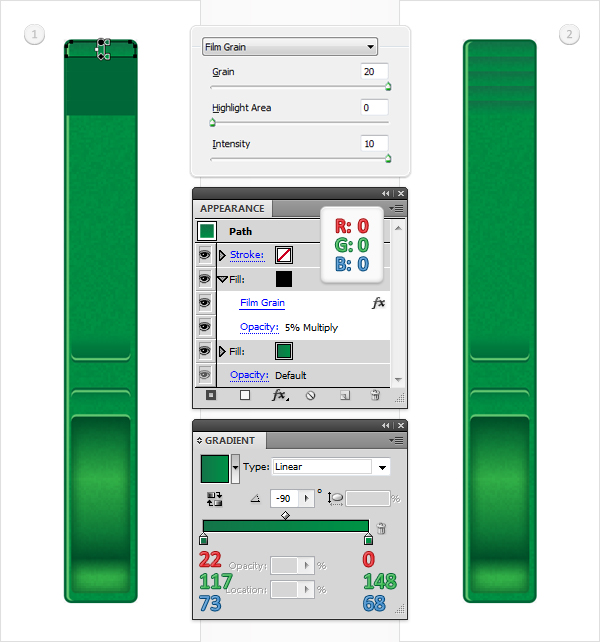
Step 9
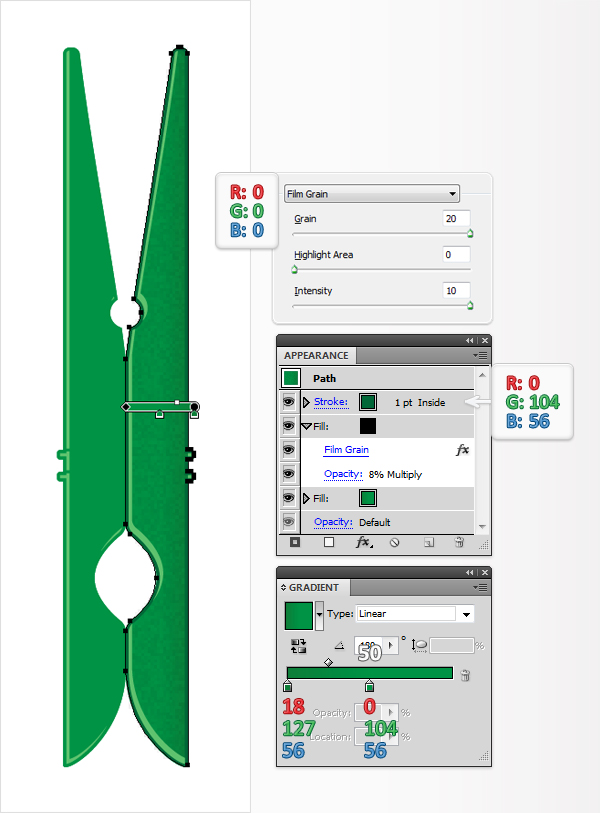
Reselect the right, green shape and focus on the Appearance panel. First, replace the flat green with the linear gradient shown below. Next, add a second fill using the Add New Fill button. It’s the little, white square icon from the bottom of the Appearance panel.Select this new fill, make it black, lower its Opacity to 8%, change the blending mode to Multiply, and go to Effect > Artistic > Film Grain. Enter the data shown below and click OK. Continue in the Appearance panel and add a 1pt stroke for this shape. Set its color at R=0, G=104, B=56, and align it to inside. The white number from the gradient image stands for location percentage.
Step 10
Select the left green shape, focus on the Appearance panel, and add a second fill. Make it black, lower its Opacity to 8%, change the blending mode to Multiply, and apply Effect > Artistic > Film Grain. Enter the data shown below and click OK. Continue in the Appearance panel and add a 1pt stroke for this shape. Set its color at R=0, G=104, B=56, and align it to the inside.
Step 11
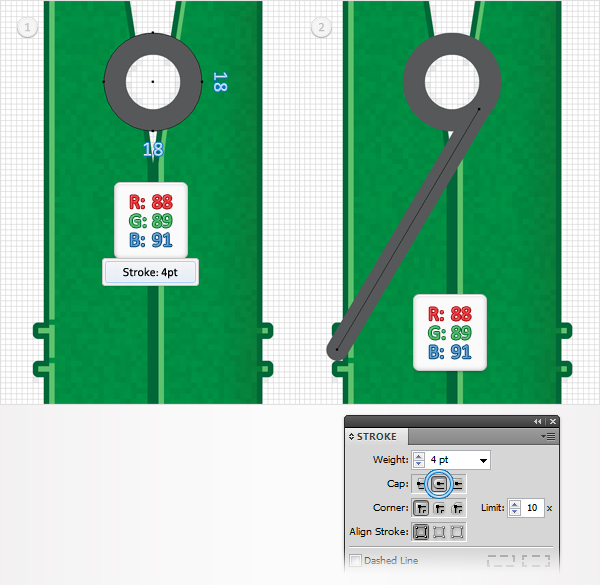
Re-enable the Grid (View > Show Grid) and the Snap to Grid (View > Snap to Grid) then switch to "gridline every 1px". Pick the Ellipse Tool (L), create an 18px circle, and place it as shown in the first image. Fill it with none and add a 4pt stroke. Set its color at R=88, G=89, B=91, and align it to inside.Switch to the Pen Tool, and draw an oblique path, as shown in the first image. Again, the Snap to Grid should ease your work. Add a 4pt stroke for this path, set its color at R=88, G=89, B=91, and open the Stroke panel. Focus on the Cap section and check the Round Cap button. In the end, it should look like the second image below.
Step 12
Reselect the two paths created in the previous step and go to Object > Path > Outline Stroke. Select the resulting shape and simply click on the Unite button from the Pathfinder panel.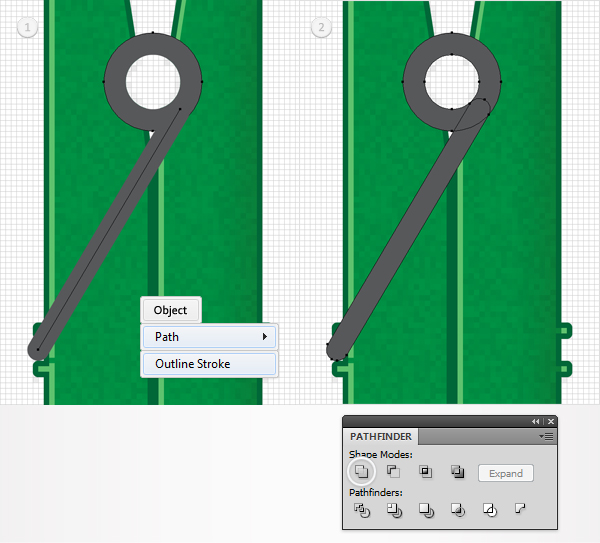
Step 13
Select the shape created in the previous step and make two copies in front (Command + C > Command + F > Command + F). Select the top copy and move it 1px to the right. Reselect both copies and click on the Minus Front button from the Pathfinder panel. Turn the resulting group of shapes into a compound path (Object > Compound Path > Make) and fill it with white.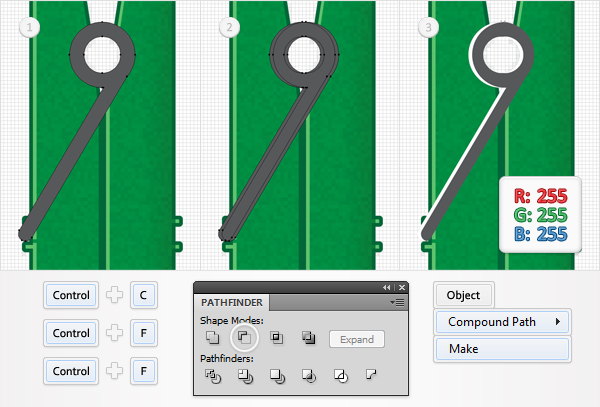
Step 14
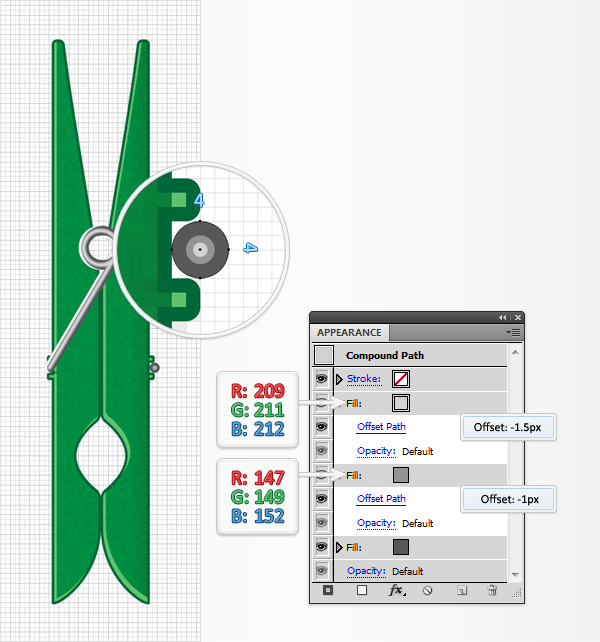
Reselect the gray shape created in step 12, focus on the Appearance panel, and add a second fill. Select it, set its color at R=147, G=149, B=152, and go to Effect > Path > Offset Path. Enter a -1px Offset and click OK. Add a third fill for this shape, select it, set its color at R=209, G=211, B=212, and go to Effect > Path > Offset Path. Enter a -1.5px Offset and click OK.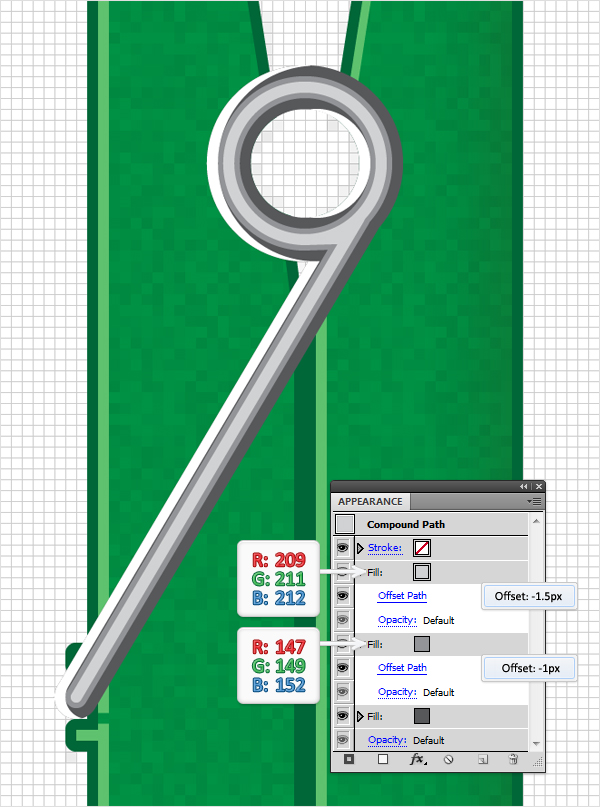
Step 15
Pick the Ellipse Tool, create a 4px circle, fill it with R=88, G=89, B=91, and place it as shown in the following image. Next, you need to add the properties from the previous step to this small circle.Here is how you can easily copy them. Go to the Layers panel, focus on the right side, and you’ll notice that every shape comes with a little gray circle. It’s called a target icon. Hold alt, click on the circle that stands for the shape edited in the previous step and drag onto the circle that stands for the little circle created in the beginning of this step.
Step 16
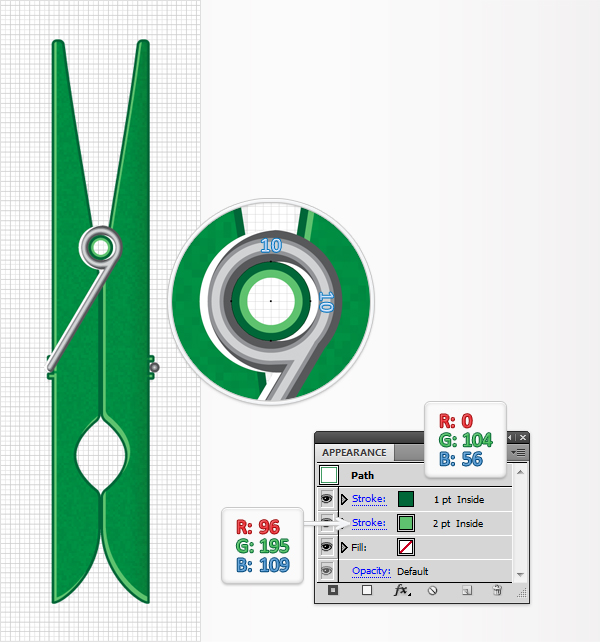
Pick the Ellipse Tool, create a 10px circle and place it as shown in the following image. Remove the color from the fill and add a 2pt stroke. Set its color at R=96, G=195, B=109, and align it to inside.Move to the Appearance panel and add a second stroke for this shape using the Add New Stroke button. It’s the little, black square icon located at the bottom, left corner of the Appearance panel. Select this new stroke, make it 1pt wide, set its color at R=0, G=104, B=56, and align it to inside.
Step 17
Select all the shapes created so far (except the 10px circle created in the previous step) and duplicate them (Command + C > Command + F). Select these copies, click on the Unite button from the Pathfinder panel, then go to Object > Compound Path > Make. Fill the resulting path with black, send it to back (Shift + Command + [ ), lower its Opacity to 25%, and move it 1px to the right.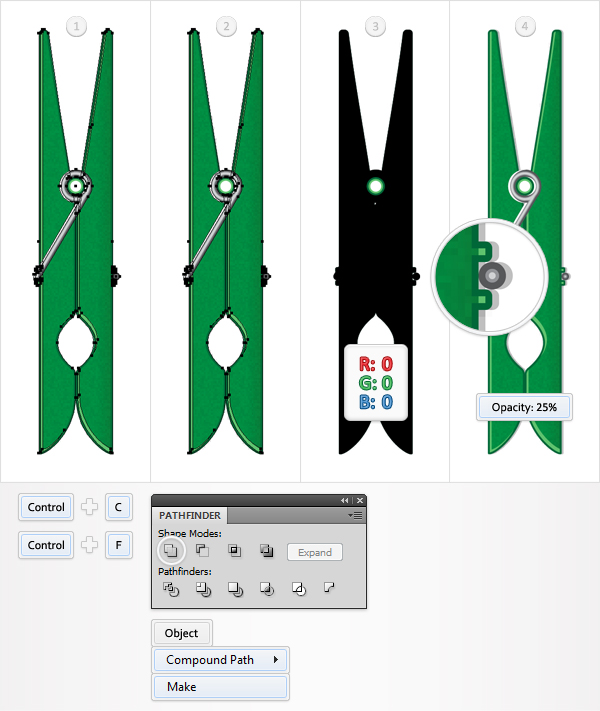
Step 18
Reselect the path created in the previous step, make a copy in front (Command + C > Command + F), select it, and move it 1px to the right. Increase its Opacity to 40% and go to Effect > Blur > Gaussian Blur. Enter a 3px radius and click OK.
Step 19
Return to "gridline every 5px". Pick the Rectangle Tool (M) and create a 30 by 230px shape. Fill it with R=0, G=148, B=68, remove the color from the stroke, and go to Effect > Stylize > Rounded Corners. Enter a 3px radius, click OK, and go to Object > Expand Appearance.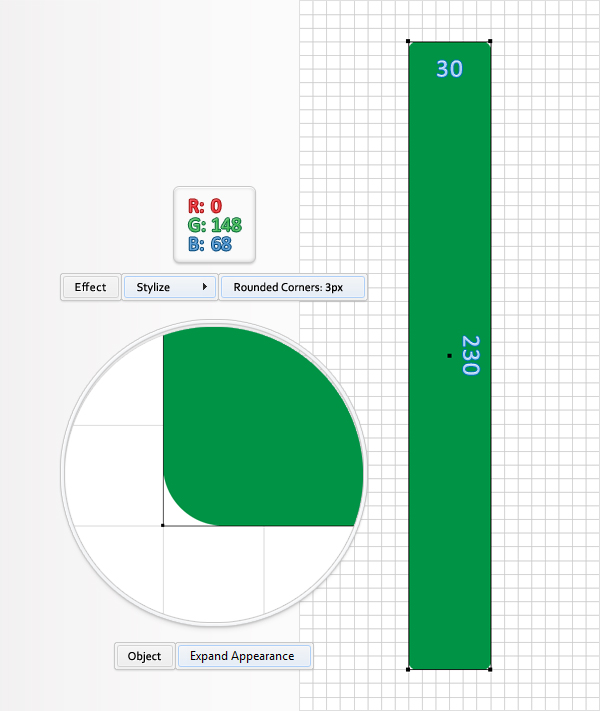
Step 20
Disable the Snap to Grid (View > Snap to Grid). Select the shape created in the previous step and go to Object > Path > Offset Path. Enter a -1px Offset and click OK. Duplicate the resulting shape (Command + C > Command + F). Select this copy and move it 1px to the right. Reselect both shapes created in this step, move to the Pathfinder panel, and click on the Minus Front button. Fill the resulting shape with R=96, G=195, B=109.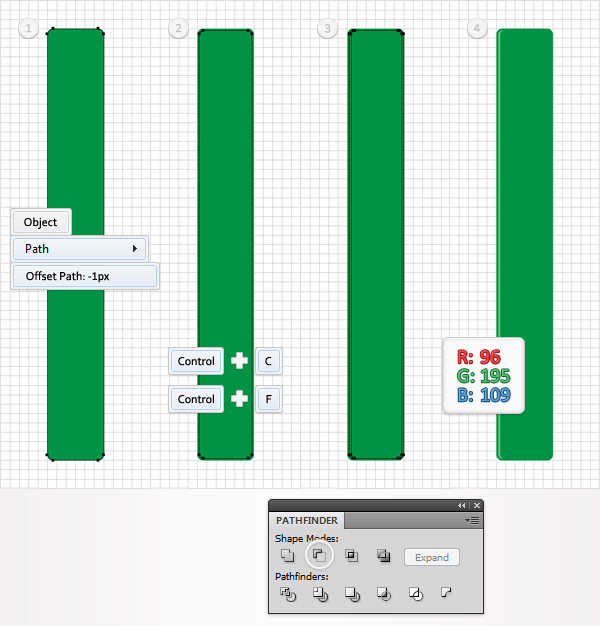
Step 21
Focus on the green, rounded rectangle created in step 19 and use the technique mentioned in step 15 to copy the properties used for the green shape edited in step 10.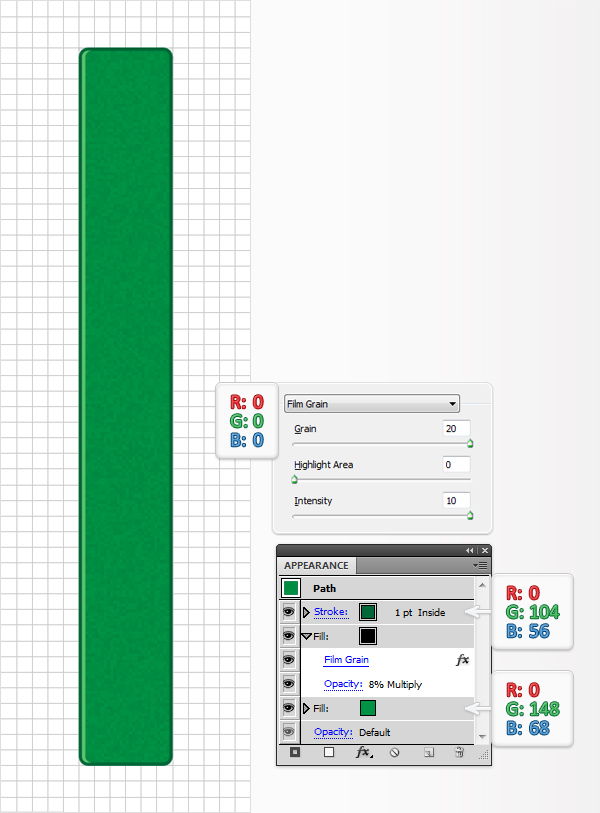
Step 22
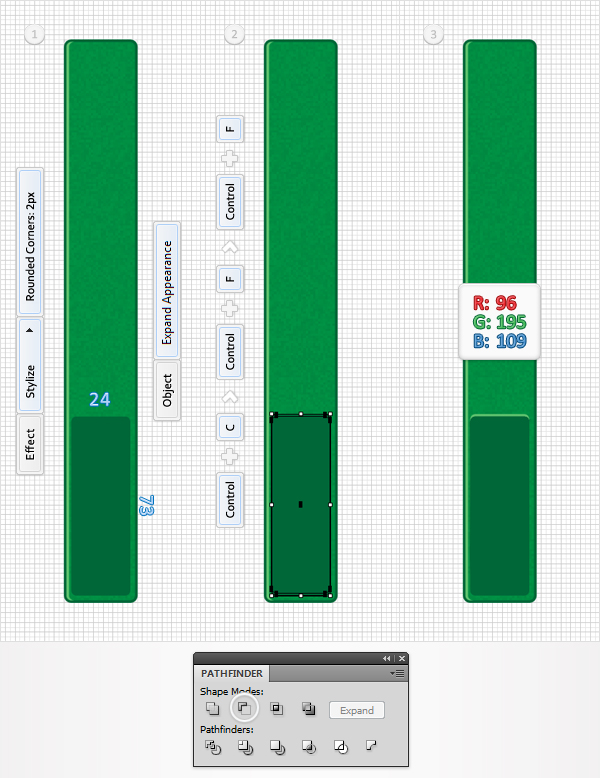
Re-enable the Snap to Grid (View > Snap to Grid) and switch to "gridline every 1px". Pick the Rectangle Tool, create a 24 by 73px shape, and fill it with a random color. Place it as shown in the first image and go to Effect > Stylize > Rounded Corners. Enter a 2px radius, click OK, and go to Object > Expand Appearance.Select the resulting shape and make two copies in front (Command + C > Command + F > Command + F). Select the bottom copy and move it 1px up. Reselect both copies and click on the Minus Front button from the Pathfinder panel. Fill the resulting shape with R=96, G=195, B=109.
Step 23
Reselect the rounded rectangle created in the previous step and replace the flat color used for the fill with the linear gradient shown below. Remember the the white numbers from the gradient image stand for location percentage.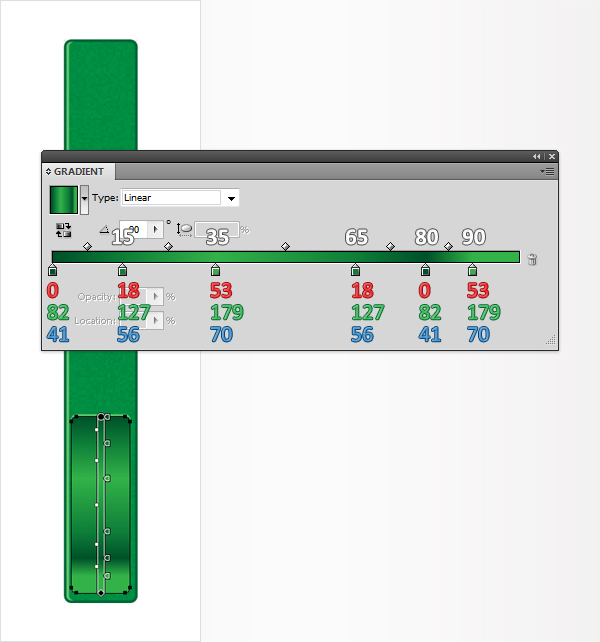
Step 24
Reselect the shape edited in the previous step, focus on the Appearance panel, and add a second fill. Make it black, lower its Opacity to 5%, change the blending mode to Multiply, and go to Effect > Artistic > Film Grain. Enter the data shown below and click OK. Keep focusing on the Appearance panel, make sure that no fill or stroke is selected and go to Effect > Stylize > Inner Glow. Enter the data shown below and click OK.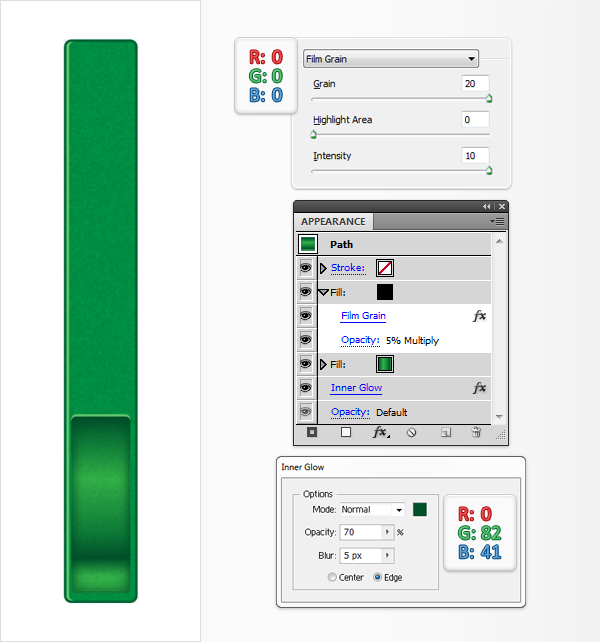
Step 25
Pick the Rectangle Tool, create a 24 by 9px shape, and fill it with the linear gradient shown below. Place it as shown in the following image and go to Effect > Stylize > Rounded Corners. Enter a 2px radius, click OK, and go to Object > Expand Appearance.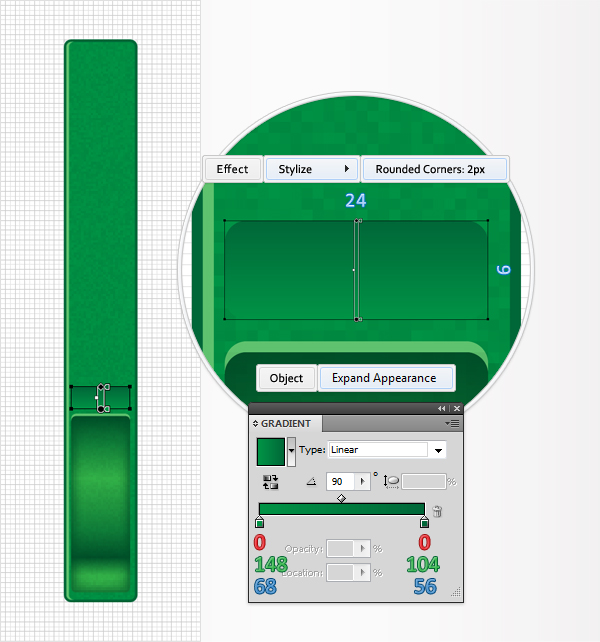
Step 26
Select the shape created in the previous step and make two copies in front (Command + C > Command + F > Command + F). Select the top copy and move it 1px down. Reselect both copies and click on the Minus Front button from the Pathfinder panel. Fill the resulting shape with R=0, G=104, B=56.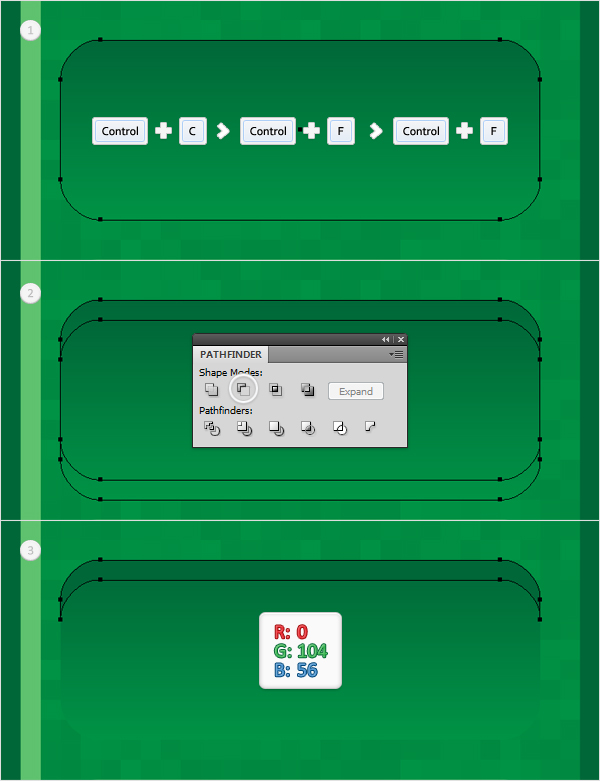
Step 27
Reselect the shape created in step 25 and make two new copies in front (Command + C > Command + F > Command + F). Select the top copy and move it 2px down. Reselect both copies and click on the Minus Front button from the Pathfinder panel. Fill the resulting shape with R=96, G=195, B=109.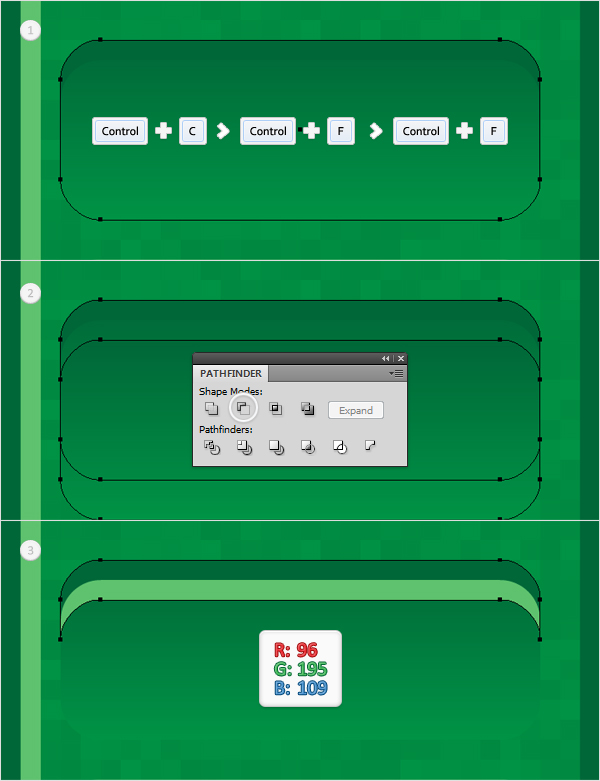
Step 28
Reselect the shape created in step 25 and make a copy in front (Command + C > Command + F). Fill it with the linear gradient shown in the second image and open the Transparency panel. Select this copy, along with the original shape, open the fly-out menu of the Transparency panel and click on Make Opacity Mask. In the end, your masked shape should look like the third image shown.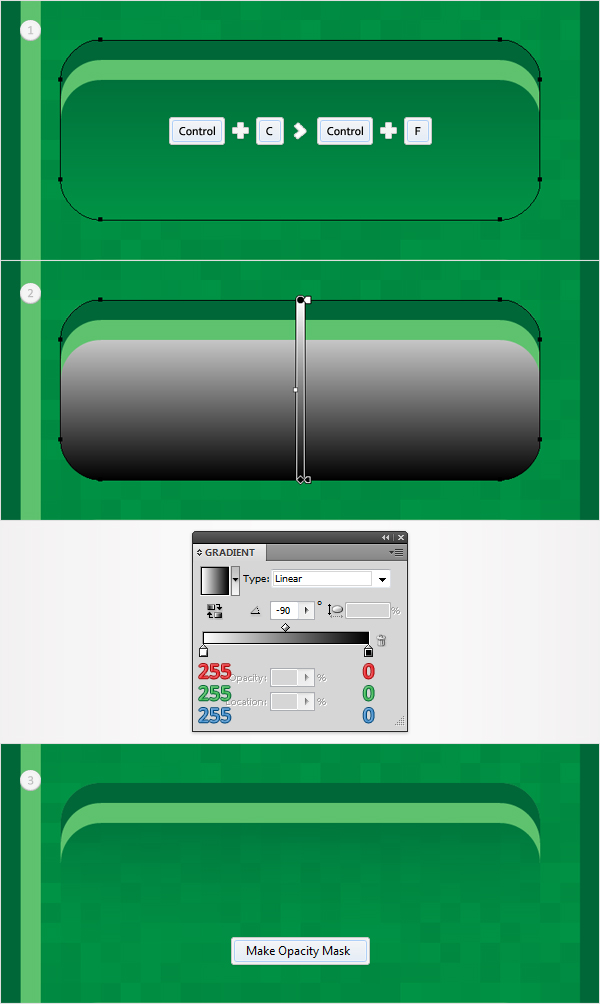
Step 29
Pick the Rectangle Tool, create a 24 by 15px shape, and fill it with the linear gradient shown below. Place it as shown in the following image and go to Effect > Stylize > Rounded Corners. Enter a 2px radius, click OK, and go to Object > Expand Appearance.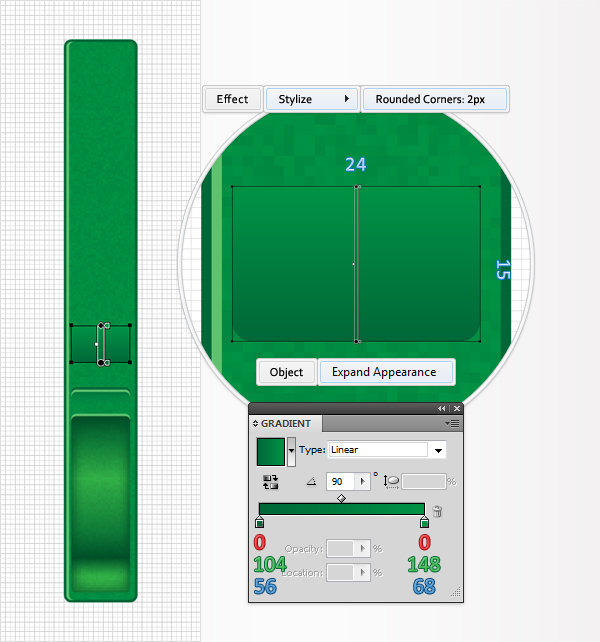
Step 30
Select the shape created in the previous step and make two copies in front (Command + C > Command + F > Command + F). Select the top copy and move it 1px up. Reselect both copies and click on the Minus Front button from the Pathfinder panel. Fill the resulting shape with R=0, G=104, B=56.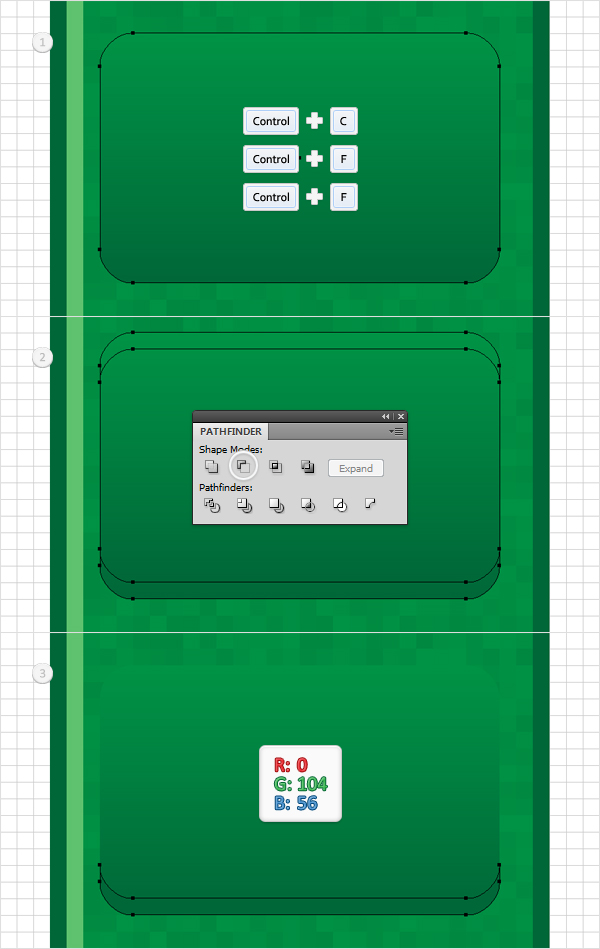
Step 31
Reselect the rounded rectangle created in step 29 and make two copies in front (Command + C > Command + F > Command + F). Select the top copy and move it 2px up. Reselect both copies and click on the Minus Front button from the Pathfinder panel. Fill the resulting shape with R=96, G=195, B=109.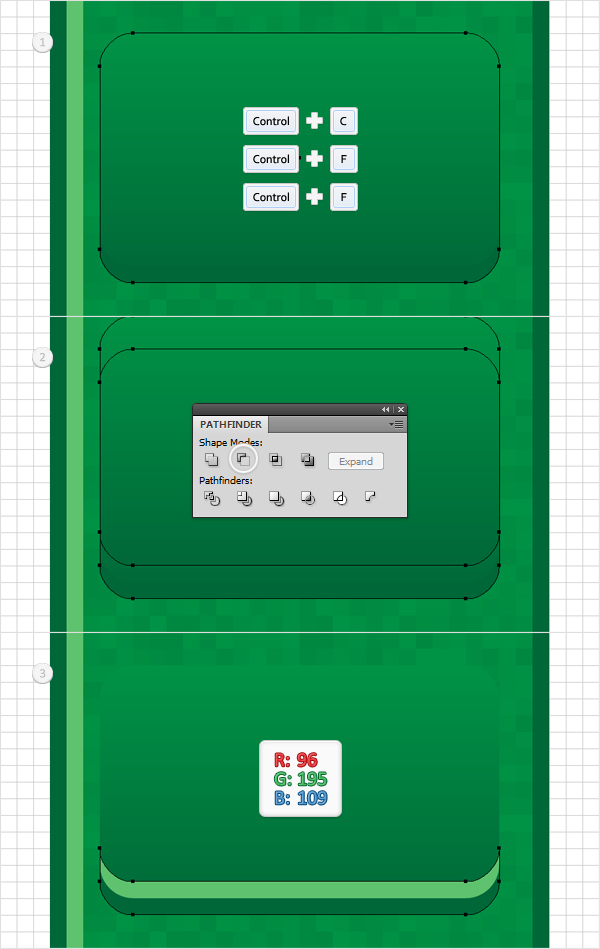
Step 32
Reselect the rounded rectangle created in step 29 and make a copy in front (Command + C > Command + F). Fill it with the linear gradient shown in the second image. Select this copy, along with the original shape, open the fly-out menu of the Transparency panel, and click on Make Opacity Mask. In the end, your masked shape should look like the third image shown.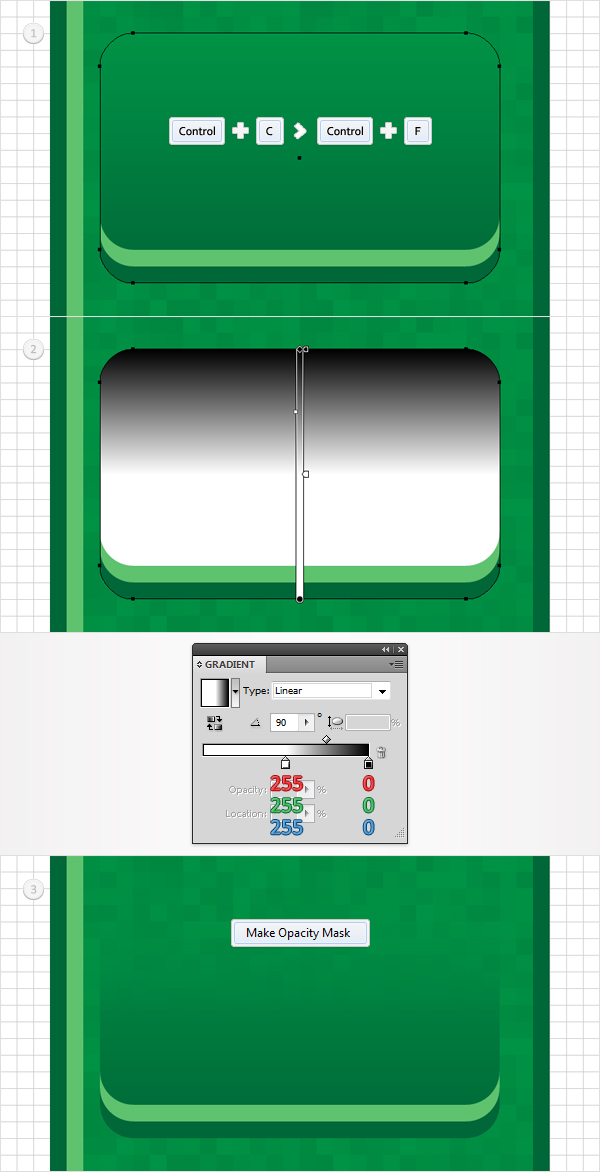
Step 33
Pick the Rectangle Tool (M) and create a 28 by 6px shape. Fill it with a random color and place it as shown in the first image.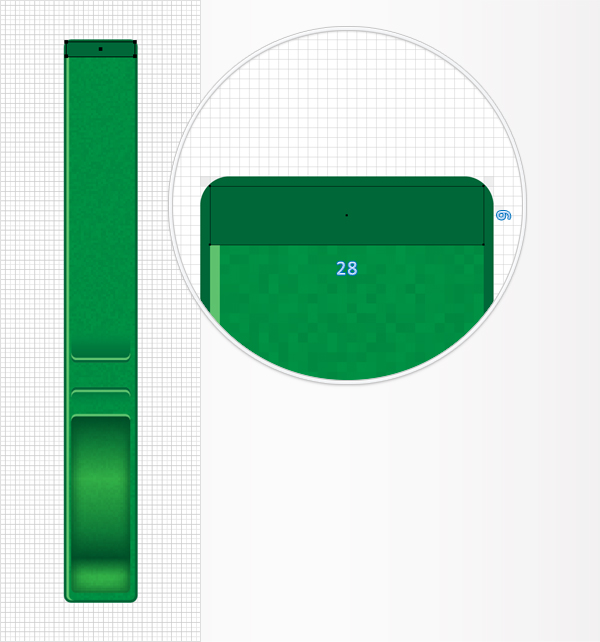
Step 34
Select the rectangle created in the previous step and go to Effect > Distort & Transform > Transform. Enter the data shown below, click OK, and go to Object > Expand Appearance. In the end, you should have a group of five, perfectly aligned rectangles.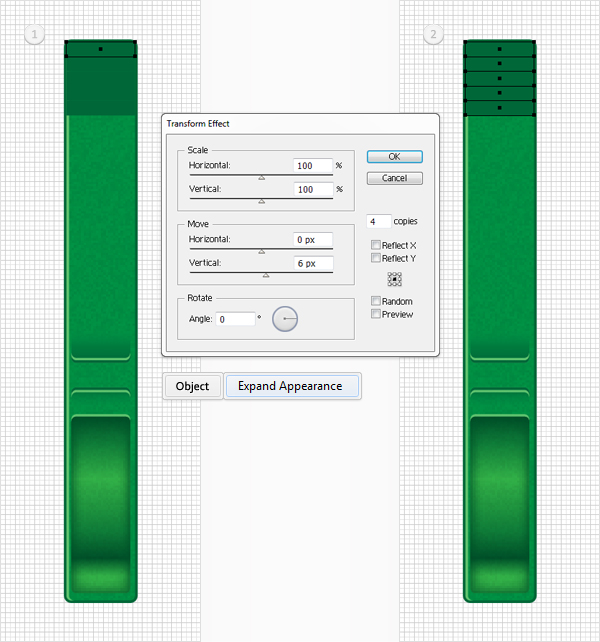
Step 35
Select the large, rounded rectangle edited in step 21, and go to Object > Path > Offset Path. Enter a -1px Offset and click OK. Select the resulting shape, along with the top rectangle created in the previous step, and click on the Intersect button from the Pathfinder panel.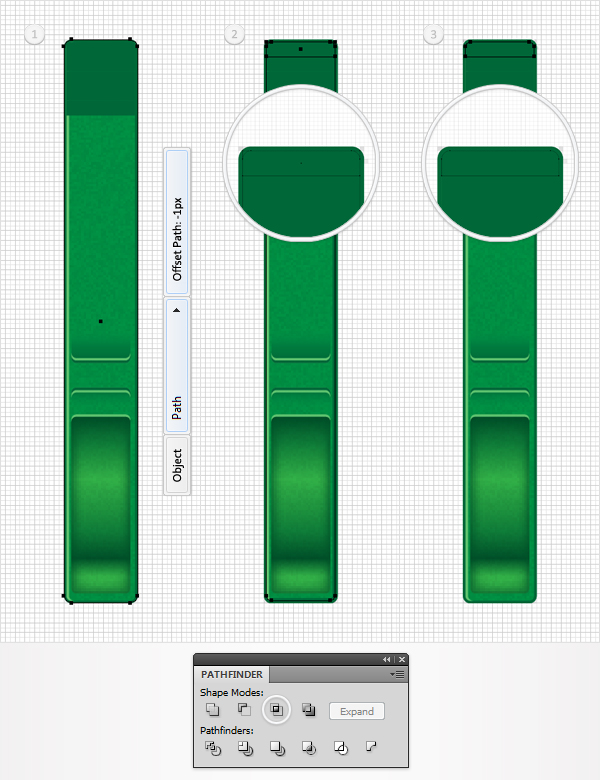
Step 36
Reselect the shape created in the previous step and focus on the Appearance panel. First, replace the flat color from the fill with the linear gradient shown below. Add a second fill for this shape and make it black.Select it, lower its Opacity to 5%, change the blending mode to Multiply, and go to Effect > Artistic > Film Grain. Enter the data shown below and click OK. Move down to the other four rectangles and add the same properties. Use the target icons to easily copy the properties.
Step 37
Pick the Rectangle Tool, create a 27 by 55px shape, and place it as shown in the following image. Remove the color from the fill add a 4pt stroke, set its color at R=88, G=89, B=91, and go to Effect > Stylize > Rounded Corners. Enter a 5px radius and click OK.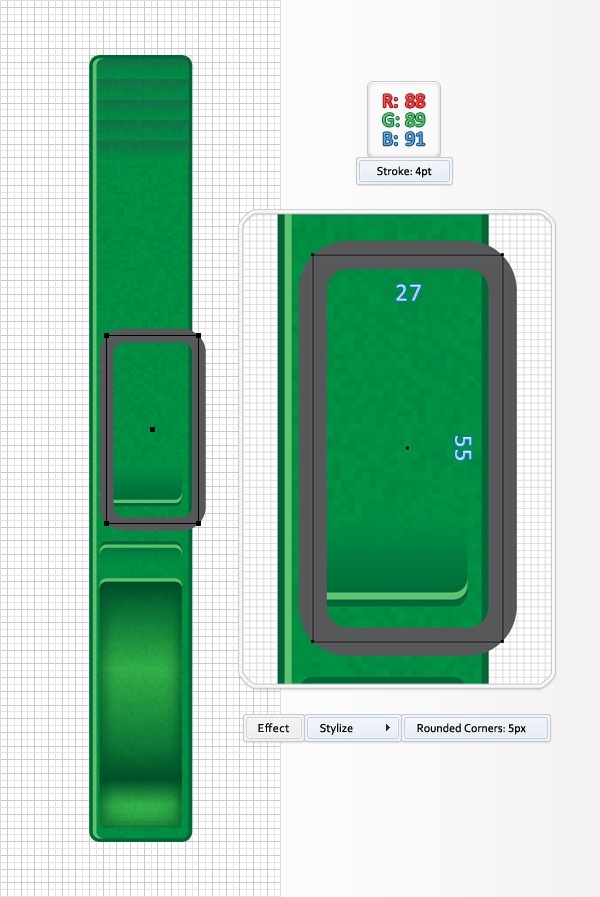
Step 38
Focus on the rectangle created in the previous step. Pick the Direct Selection Tool (A), select the top, left anchor point, and hit the Delete key on your keyboard. Select the resulting path and move to the Stroke panel. Check the Round Cap button and then apply Object > Path > Outline Stroke.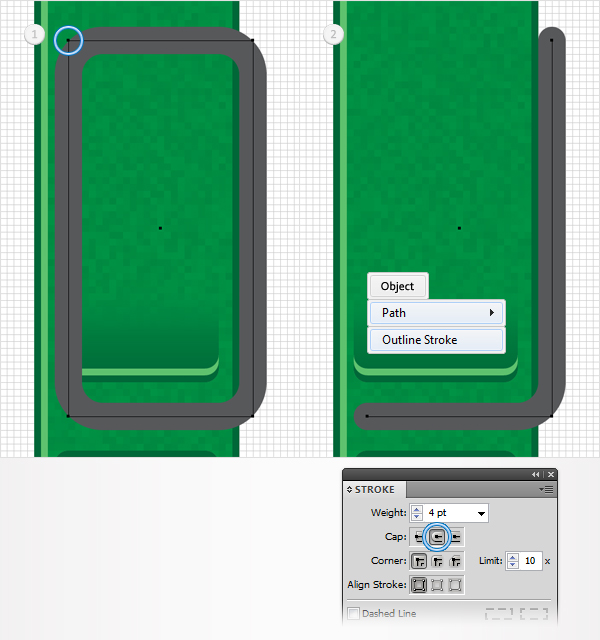
Step 39
Select the shape created in the previous step and make two copies in front (Command + C > Command + F > Command + F). Select the top copy and move it 1px to the right. Reselect both copies and click on the Minus Front button from the Pathfinder panel. Fill the left shape with R=209, G=211, B=212, and the right shape with R=65, G=64, B=66.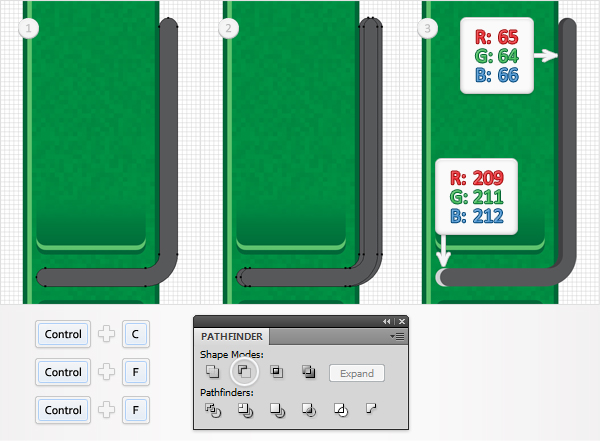
Step 40
Copy the properties used for the small circle edited in step 15 to form the gray shape created in step 38.
Step 41
Pick the Rectangle Tool, create a 4 by 59px shape, and fill it with R=88, G=89, B=91. Place it as shown in the following image and go to Effect > Stylize > Rounded Corners. Enter a 2px radius, click OK, and go to Object > Expand Appearance.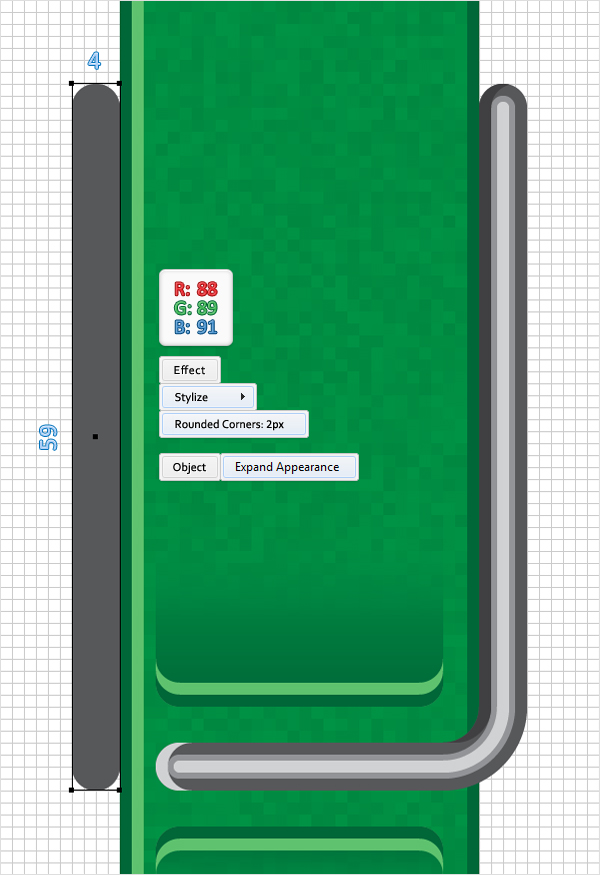
Step 42
Select the shape created in the previous step and make two copies in front (Command + C > Command + F > Command + F). Select the top copy and move it 1px to the right. Reselect both copies and click on the Minus Front button from the Pathfinder panel. Fill the resulting shape with white.
Step 43
Again, copy the properties used for the small circle edited in step 15 to the rounded rectangle created in step 41.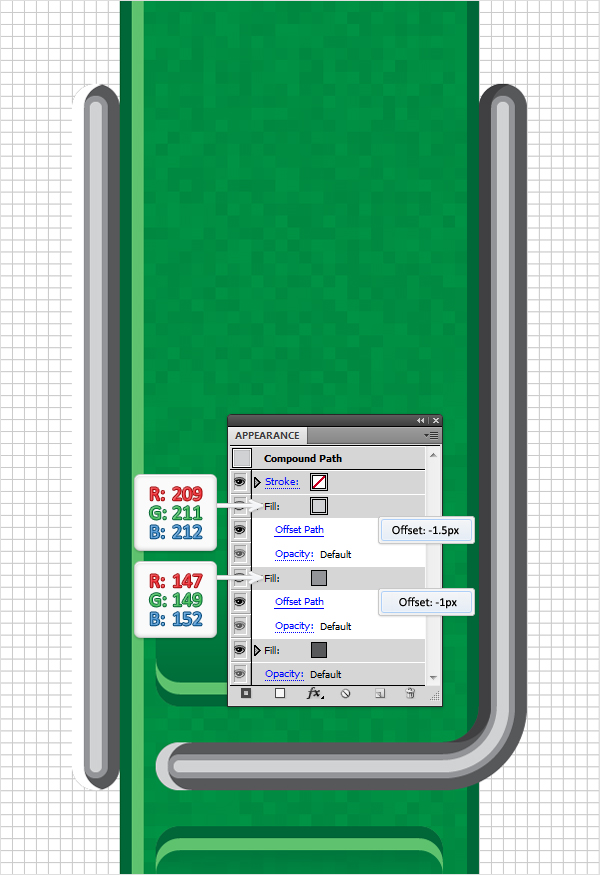
Step 44
Select all the shapes created starting with the nineteenth step and duplicate them (Command + C > Command + F). Select these copies, click on the Unite button from the Pathfinder. Fill the resulting path with black, send it to back (Shift + Command + [ ), lower its opacity to 25% and move it 1px to the right.
Step 45
Reselect the path created in the previous step, make a copy in front (Command + C > Command + F), select it, and move it 1px to the right. Increase its Opacity to 40% and go to Effect > Blur > Gaussian Blur. Enter a 3px radius and click OK.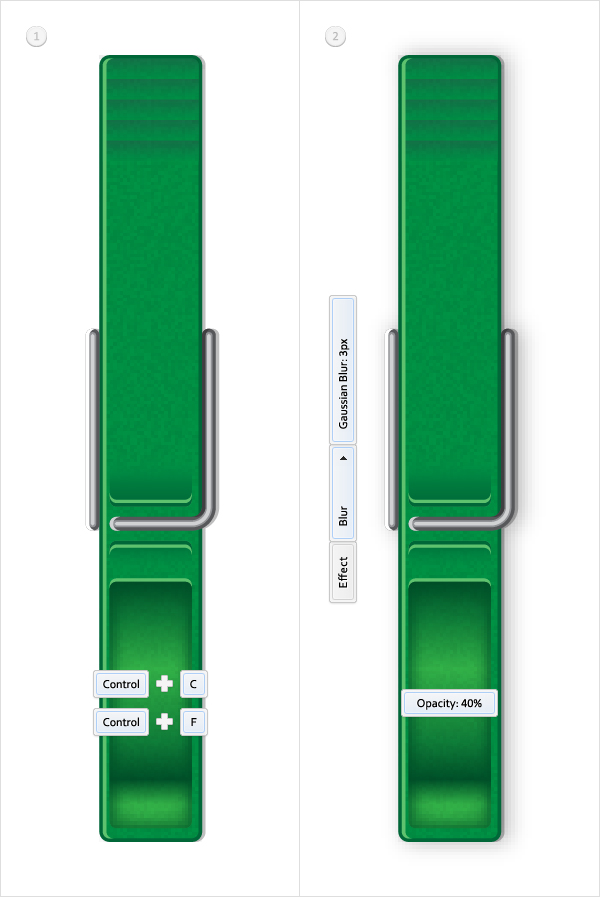
Conclusion
Now your work is done. Here is how it should look.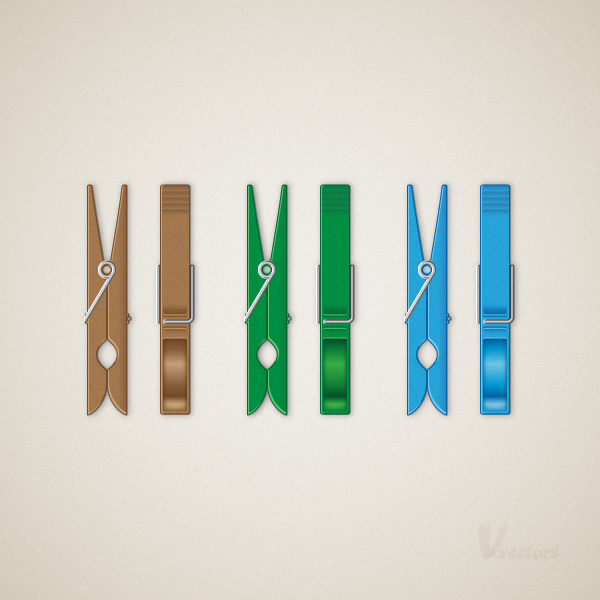
Tidak ada komentar:
Posting Komentar