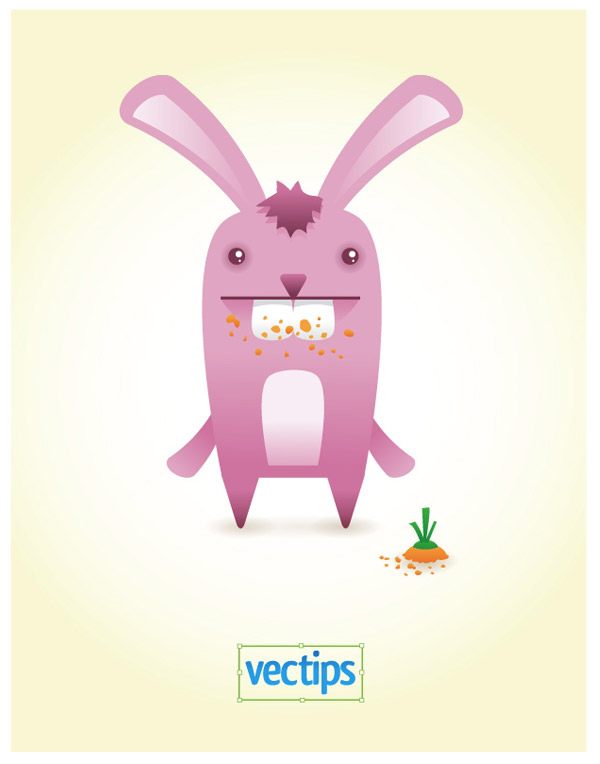
Tutorial Details
- Program: Illustrator
- Difficulty: Intermediate-Advanced
- Completion Time: 1-2 hours
Final Product What You'll Be Creating
Step 1
Before
we start, I wanted to let everyone know I will be using Illustrator CS4
for this tutorial. Don’t worry, everything I am creating can be done in
the other CS versions, I just wanted to let you know because the panels
in the images will look different. Below is an example of the new
Gradient Panel with a bunch of new goodies, but for this tutorial we
will only be using the features that are in the other CS versions.
Step 2
Create a new document, then make a 190 px wide by 290 px tall rectangle with the Rectangle Tool (M).
Step 3
With
your Direct Selection Tool (A), select the top left corner of the
rectangle. With the point selected, the Control Panel defaults to the
Anchor Point options. Press the second to the left button, converting
the anchor point to a smooth point.
Step 4
Repeat the previous step with the top right anchor point.
Step 5
Fill
the rectangle with a Linear Gradient from the Gradient Panel and change
the first swatch to a pink color and the second swatch to a darker pink
color.
Step 6
Use the Gradient Tool to adjust the gradient by clicking and dragging from the middle of the shape to the bottom.
Step 7
Copy
(Command + C) the shape and Paste in Front (Command + F). With the new
shape selected, use the Selection Tool (V) and scale the shape to half
of its original size. After scaling, place the the copied shape towards
the bottom of the original.
Step 8
Change the first swatch in the gradient fill to a light pink and the other swatch to a slightly darker pink.
Step 9
With
the Star Tool, click on the artboard to bring up the Star dialog. In
the dialog change Radius 1 to 50 px, Radius 2 to 25 px and the Points to
3.
Step 10
With the triangle selected go Effect > Stylize > Round Corners. In the dialog change the radius to 15 px.
Step 11
With
the Selection Tool (V), squish the triangle horizontally to half of its
original size. Next rotate the triangle 180 degrees.
Step 12
Fill
the triangle with a Linear Gradient, make the first swatch a dark pink
from the previous shape and the second swatch make a darker pink. Adjust
the gradient so the darkest part of the gradient is at the bottom of
the triangle.
Step 13
Place
the triangle at the bottom of the bigger body shape creating a leg.
Once placed, drag out a copy of the leg to other side. Simply hold down
Alt + Shift while dragging the shape.
Step 14
Create a 200 px wide by 50 px tall rectangle and round the corners at 25 px.
Step 15
Go
to Effect > Warp > Arch. With the Warp Options dialog open,
change the Bend to 20 and the Horizontal Distortion to -49. Next, make
sure to expand the effects by going to Object > Expand Appearance. If
you don’t do this you will get some unexpected results as the steps
continue.
Step 16
Rotate
the shape 45 degrees to the right so the shape is vertical. Next, place
the shape over the top of the body shape. Once placed, Copy (Command +
C) and Paste in Front (Command + F) the ear shape. Reflect the shape
vertically by going to Object > Transform > Reflect and choosing
the Vertical option in the dialog. Once reflected, move the copied ear
to the other side of the body.
Step 17
Change the fill of the the ears to the first swatch pink color in the body shape.
Step 18
Select
the first ear and go to Object > Path > Offset to open the Offset
dialog. Change the Offset to -15 px. Next, move the offset slightly
down and to the left.
Step 19
Change the fill of the offset to the light Linear Gradient that was used in the belly shape of the body.
Step 20
Repeat the same step for the right ear shape.
Step 21
Copy
(Command + C) and Paste (Command + V) the main right ear shape. Rotate
the copied shape 190 degrees and scale it down to half of its original
size. Fill the shape with the original body gradient and place it behind
the lower left side of the body.
Step 22
Copy
(Command + C) and Paste in Front (Command + F) the arm shape, reflect
it vertically, then place it on the other side of the body.
Step 23
Now
that the body is done, we can start adding a face to the bunny. Start
by creating an ellipse with the Ellipse Tool (L) that is 37 px by 37 px.
Fill the ellipse with a Radial Gradient with the first swatch a dark
pink and the second swatch the same pink as in the ears.
Step 24
Create
another ellipse with the previous one, but smaller, and fill it with a
dark pink color. Next draw two smaller white filled ellipses within the
dark pink one. Now you have an eye!
Step 25
Place
the eye shapes over the top left part of the body shape. Once placed,
Copy (Command + C) and Paste the (Command + V) the eye shapes and place
them on the other side of the body.
Step 26
Create
a triangle like before and scale it down to half of its original size.
Also like the other triangle, round the corners and fill it with the
same gradient. Next, place the triangle over the middle part of the body
below the eyes.
Step 27
With
the Line Tool (\) draw a dark pink (same as the dark pink eye color) 3
pt line right below the nose, spanning the distance of the eyes.
Step 28
Draw
a ellipse so the bottom fourth of it is the width of the line you just
drew. Next, draw a rectangle that encompasses the top half of the
ellipse up to the line you drew. Select the rectangle and ellipse and
press the Subtract Shape Areas button from the Pathfinder Panel. While
still in the Pathfinder Panel, press the Expand button. If you own CS4,
Illustrator expands it for you!
Step 29
Fill
the subtracted shape with the same Linear Gradient as the body
gradient, but adjust it so the darker part of the gradient is at the
top. Place the shape behind the line you created before.
Step 30
Create
a rectangle that is 38 px wide by 40 px tall. Like with the main body
shape, select the bottom left anchor point with the Direct Selection
Tool (A) and change the anchor to a Smooth Point. Do the same for the
bottom right anchor point.
Step 31
Place
the tooth shape behind and below the mouth line on the left side of the
nose shape. Fill the tooth with a Linear Gradient with the first swatch
white and the second swatch a light gray. Adjust the gradient so the
white is at the top of the tooth.
Step 32
Copy
(Command + C) the Tooth and Paste in Front (Command + F). Create an
ellipse the covers the bottom two-thirds of the tooth. Select the tooth
copy and the ellipse and Subtract the shapes. Once subtracted, change
the color of the shape to a light gray.
Step 33
Drag out a copy of the tooth shapes to the left side.
Step 34
Now
it is time to add some hair. With the Pen Tool draw a hair puff shape
towards the top of the body. Fill the shape with the same Linear
Gradient as the nose shape.
Step 35
With
the hair shape selected, Copy (Command + C) and Paste in Back (Command +
B). With the copy selected, move it down slightly. Fill the copy with
the same gradient as the main body shape and adjust it so the darker
part of the gradient is at the top of the shape.
Step 36
The
bunny character is done, but lets have some more fun to it. Let’s make
it look like the bunny just devoured a carrot! Use you Pencil Tool (N)
and draw twenty – twenty-five small ellipse like shapes over the teeth
and mouth area of the bunny (make these shapes a bit rough). Fill the
shapes with a Linear Gradient, set the first swatch to an orange color
and the second to a darker orange color.
Step 37
Draw
an ellipse that is 45 px wide by 30 px tall. Draw another ellipse over
that one that is 65 px wide by 30 px tall. Place the second ellipse so
the bottom is in the center of the first one. Select both ellipses,
Intersect the Shape Areas from the Pathfinder Panel, and press Expand.
Next, fill the shape with the orange linear gradient you used for the
small elements around the mouth, then adjust the gradient so the lighter
part of the gradient is at the top of the shape.
Step 38
With
the Pencil Tool (N), create some little ellipse like shapes around and
below the previous shape. Fill these with the same orange gradient.
Step 39
Copy
(Command + C) the original top ellipse shape and Paste in Front (F).
Scale the shape down to half of its original size, then place it towards
the top of the original shape. Change the first swatch in the copied
shape to a green color and the second swatch to a darker green color.
Step 40
With
the Pen Tool (P), draw a couple stems coming out of the carrot top.
Fill these shapes with the same green gradient you just used.
Step 41
Create
an ellipse that is 75 px by 75 px. Fill it with a Radial Gradient with
the first swatch a light brown color, the second swatch a white color,
and set the ellipse to Multiply from the Transparency Panel. Next,
squish the ellipse vertically to half its original size. Place the
ellipse behind all the carrot top artwork as a drop shadow.
Step 42
Create
two more ellipses, as in the previous step, then place them behind the
feet. Create another bigger ellipse, but make the brown color of the
gradient lighter and place in between the feet shadows.
Step 43
Create
a rectangle the size of you document and fill it with a Radial
Gradient. Make the first swatch white and the second swatch a light
yellow color. All done!
Final Image
Below is the final image we just worked on.

http://vector.tutsplus.com/tutorials/illustration/how-to-create-a-cute-bunny-vector-character/


